향해 week3 - 나만의 select shop 만들기
select shop 소개
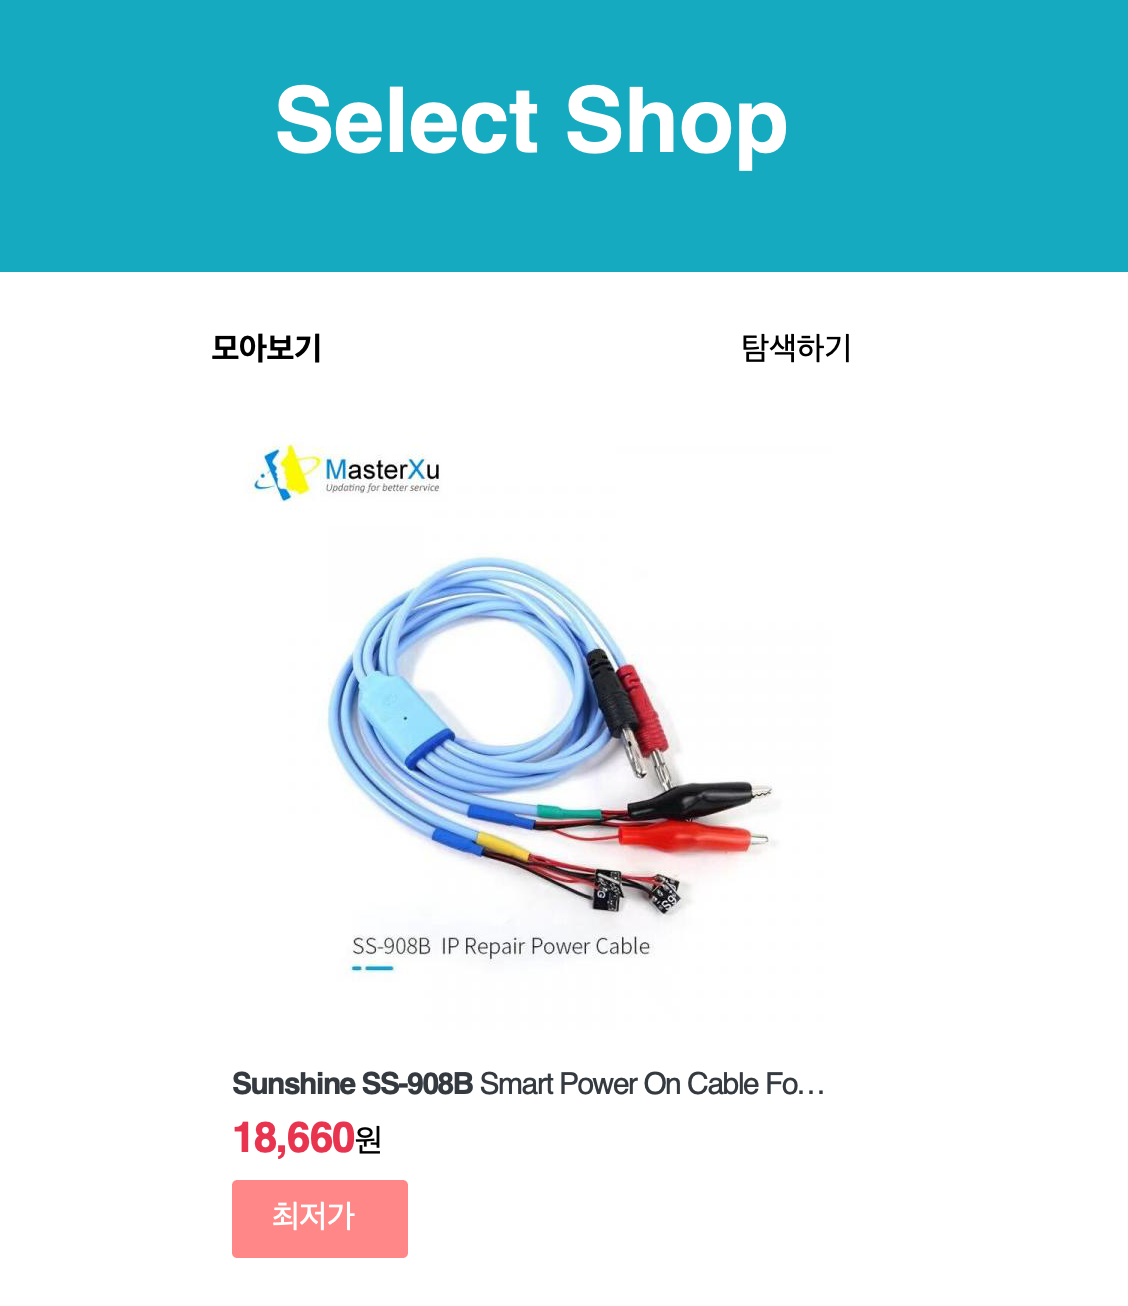
크게 2개의 페이지로 나눠져 있는 Select shop입니다.
모아보기: 즐겨 찾기 기능입니다.
내가 검색한 상품을 저장해 놓은 즐겨찾기 기능입니다
내가 생각한 최저가를 등록할 수 있으며
매일 1시에 가격을 자동으로 update 하고 난 뒤 내가 입력해 놓은 최저가 보다 낮을 경우 "최저가" 마크를 달아주고 있습니다.
탐색하기: 검색 기능입니다.
Naver api를 이용하여 상품을 검색할 수 있으며 검색한 상품을 클릭하여 즐겨 찾기(모아 보기)를 할 수 있습니다.
요구 기능
1. 상품명에 따른 검색 (naver api 사용)
2. 관심 상품 등록 & 조회
3. 관심 상품에 대한 최저가 등록하기
4. 매일 1시 가격 갱신
API 설계

1. 상품명에 따른 검색 (naver api 사용)
네이버 api에 대한 사용법은 naver api 개발 가이드에서 더욱 자세하게 확인할 수 있따.
https://developers.naver.com/docs/serviceapi/search/blog/blog.md#%EB%B8%94%EB%A1%9C%EA%B7%B8
블로그 - Search API
블로그 NAVER Developers - 검색 API 블로그 검색 개발가이드 검색 > 블로그 네이버 블로그 검색 결과를 출력해주는 REST API입니다. 비로그인 오픈 API이므로 GET으로 호출할 때 HTTP Header에 애플리케이션
developers.naver.com
우리는 네이버 쇼핑을 타겟으로 검색을 시도할 것이기 때문에 아래와 같이 쿼리를 날려보았습니다.
Advanced Rest Client 를 사용하여 api를 테스트 해 보습니다.
Naver api 사용설명서에 나와 있듯이 X-Naver-Client-Id 와 X-Naver-Client-Secret을 입력해주고 query를 날려보았습니다.
( X-Naver-Client-Id 와 X-Naver-Client-Secret 값은 오픈 API 이용 신청 을 진행하면 받을 수 있습니다. 본인의 id와 secret 값을 넣어주시면 됩니다.)
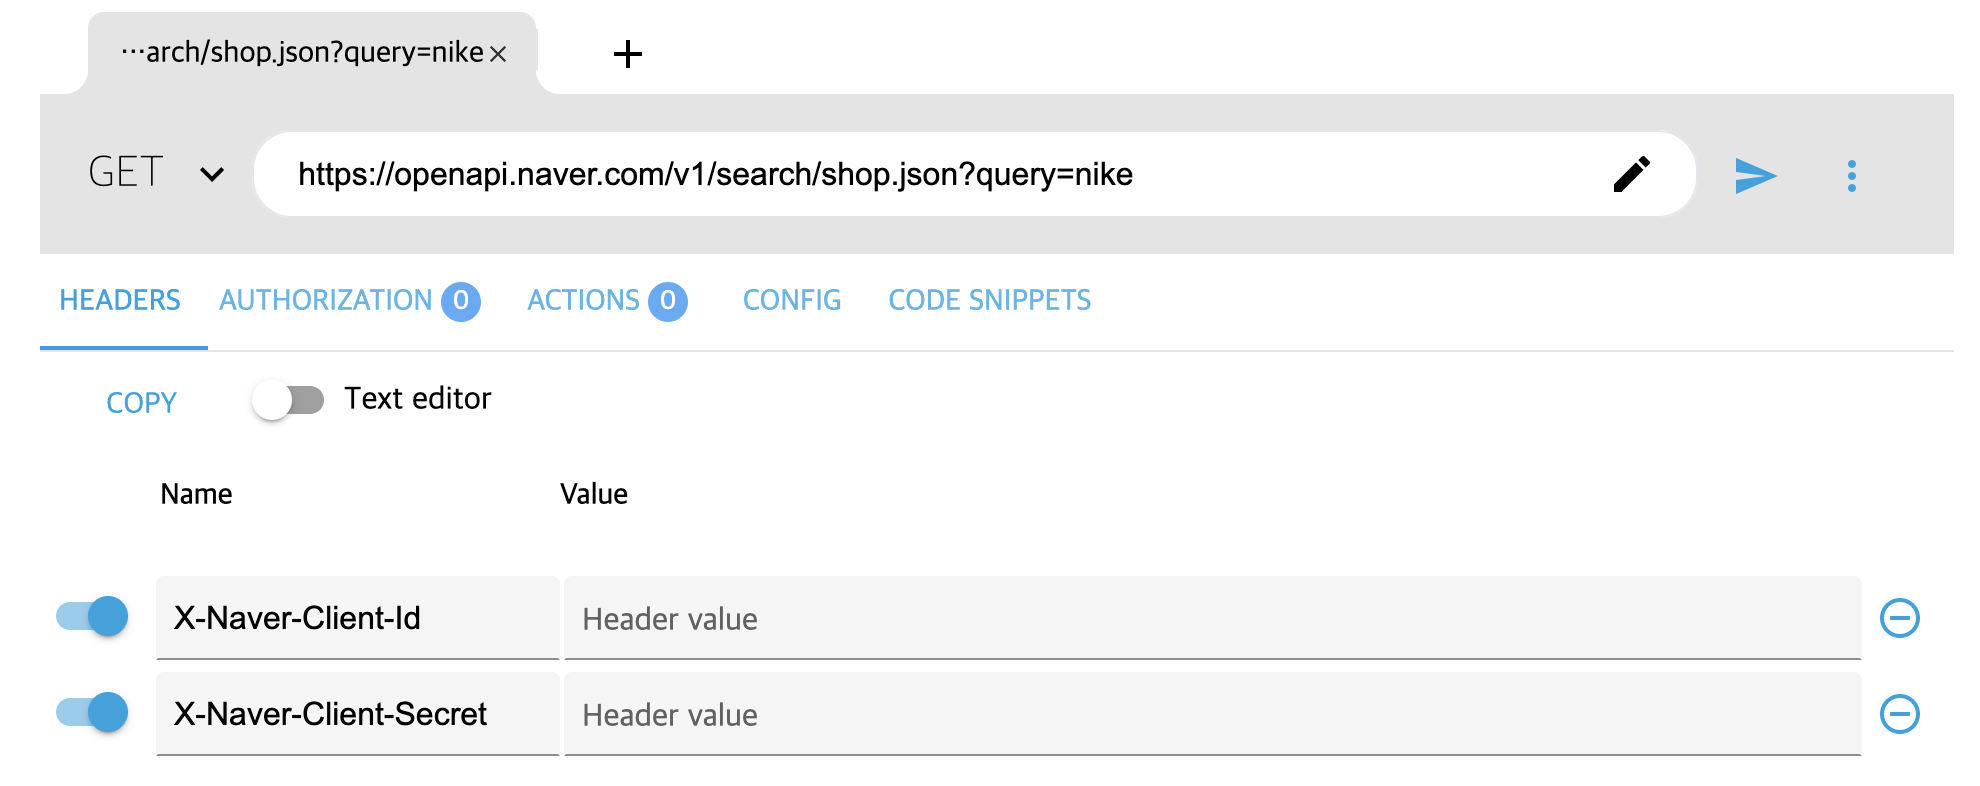
query를 정확하게 날리면 아래와 같은 응답을 받을 수 있습니다.
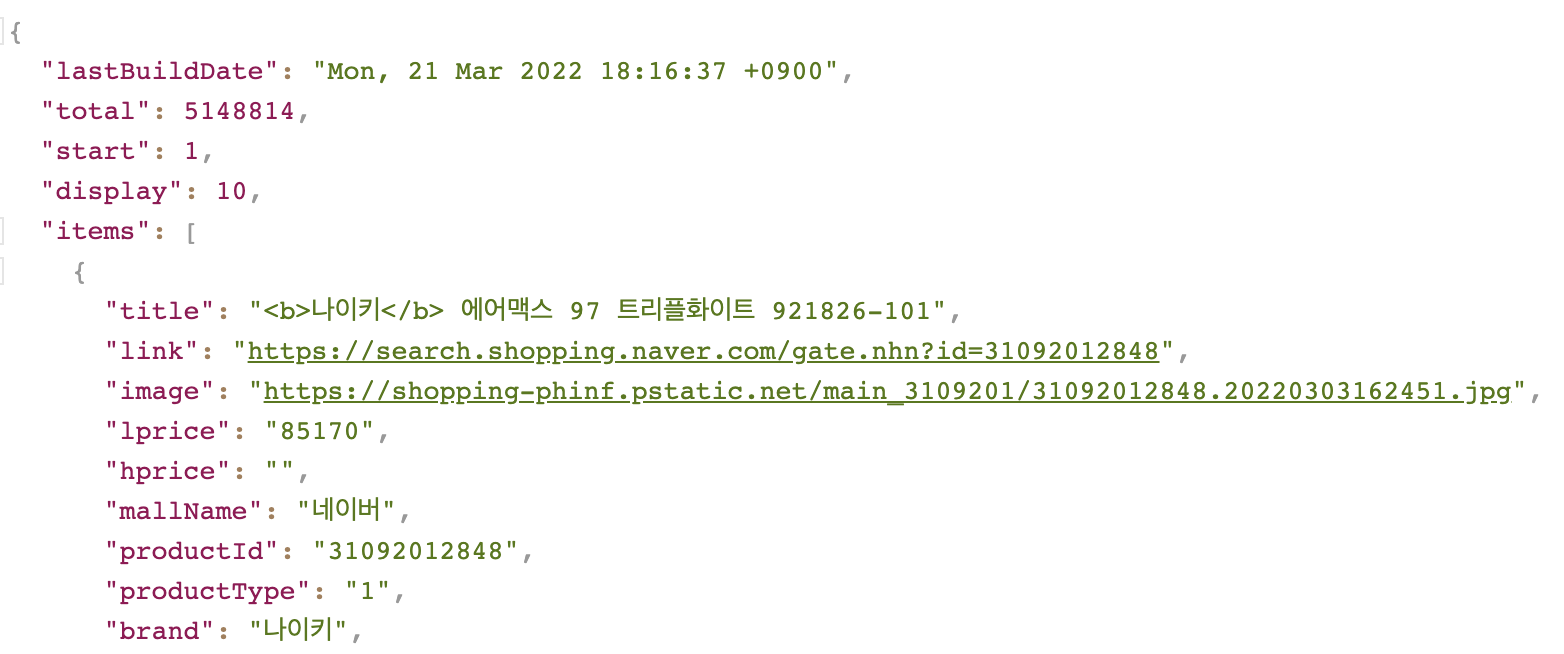
여기서 title, link, image, lprice 값만 받아서 view로 표시해주도록 해보겠습니다.
Advanced Rest Clinet 에서 code-snippets -> java -> spring 에 들어가면 sprint으로 query를 날리기 위한 command를 확인할 수 있습니다.
복사한 command를 가지고 NaverShopSearch라는 클래스를 만들어 주었습니다.
public class NaverShopSearch {

    public static void main(String[] args) {
        RestTemplate rest = new RestTemplate();
        HttpHeaders headers = new HttpHeaders();
        headers.add("X-Naver-Client-Id", "");
        headers.add("X-Naver-Client-Secret", "");
        String body = "";

        HttpEntity<String> requestEntity = new HttpEntity<String>(body, headers);
        ResponseEntity<String> responseEntity = rest.exchange("https://openapi.naver.com/v1/search/shop.json?query=nike", HttpMethod.GET, requestEntity, String.class);
        HttpStatus httpStatus = responseEntity.getStatusCode();
        int status = httpStatus.value();
        String response = responseEntity.getBody();
        System.out.println("Response status: " + status);
        System.out.println(response);
    }
}
response 출력 결과를 살펴보고 어떤 것을 사용하면 될 지 생각해 보면 될 것 같습니다.
우리는 response 결과값에서 items 부분만을 들고와서 사용하면 될 것 같습니다.
값을 가져오기 편하게 JSON 형태로 변환을 시켜줘야 할 것 같습니다.
아래와 같이 build.gradle 파일에 dependency를 추가해 줍시다.
implementation group: 'org.json', name: 'json', version: '20160810'자 이제 items를 우리의 입맛에 맞게 형태를 바꿔봅시다.
String response = responseEntity.getBody();

JSONObject jsonObject = new JSONObject(response);
JSONArray items = jsonObject.getJSONArray("items");

for (int i = 0; i < items.length(); i++) {
    JSONObject item = items.getJSONObject(i);
    int lprice = item.getInt("lprice");
    String link = item.getString("link");
    String title = item.getString("title");
    String image = item.getString("image");
    System.out.printf("%s\n%s\n%s\n%s",title, lprice, link, image);
    break;
}
출력 결과물은 아래와 같습니다.
딱 좋습니다.
우선은 NaverShopSearch 클래스는 이정도로 구현해놓고 넘어가도록 하겠습니다.

이번 프로젝트에서 사용할 index.html 입니다.
<!doctype html>
<html lang="en">
<head>
<meta charset="UTF-8">
<meta name="viewport"
content="width=device-width, user-scalable=no, initial-scale=1.0, maximum-scale=1.0, minimum-scale=1.0">
<meta http-equiv="X-UA-Compatible" content="ie=edge">
<meta property="og:title" content="재영이의 셀렉샵">
<meta property="og:description" content="관심상품을 선택하고, 최저가 알림을 확인해보세요!">
<meta property="og:image" content="images/og_selectshop.png">
<link rel="stylesheet" href="style.css">
<script src="https://ajax.googleapis.com/ajax/libs/jquery/3.5.1/jquery.min.js"></script>
<script src="basic.js"></script>
<title>나만의 셀렉샵</title>
</head>
<body>
<div class="header">
Select Shop
</div>
<div class="nav">
<div class="nav-see active">
모아보기
</div>
<div class="nav-search">
탐색하기
</div>
</div>
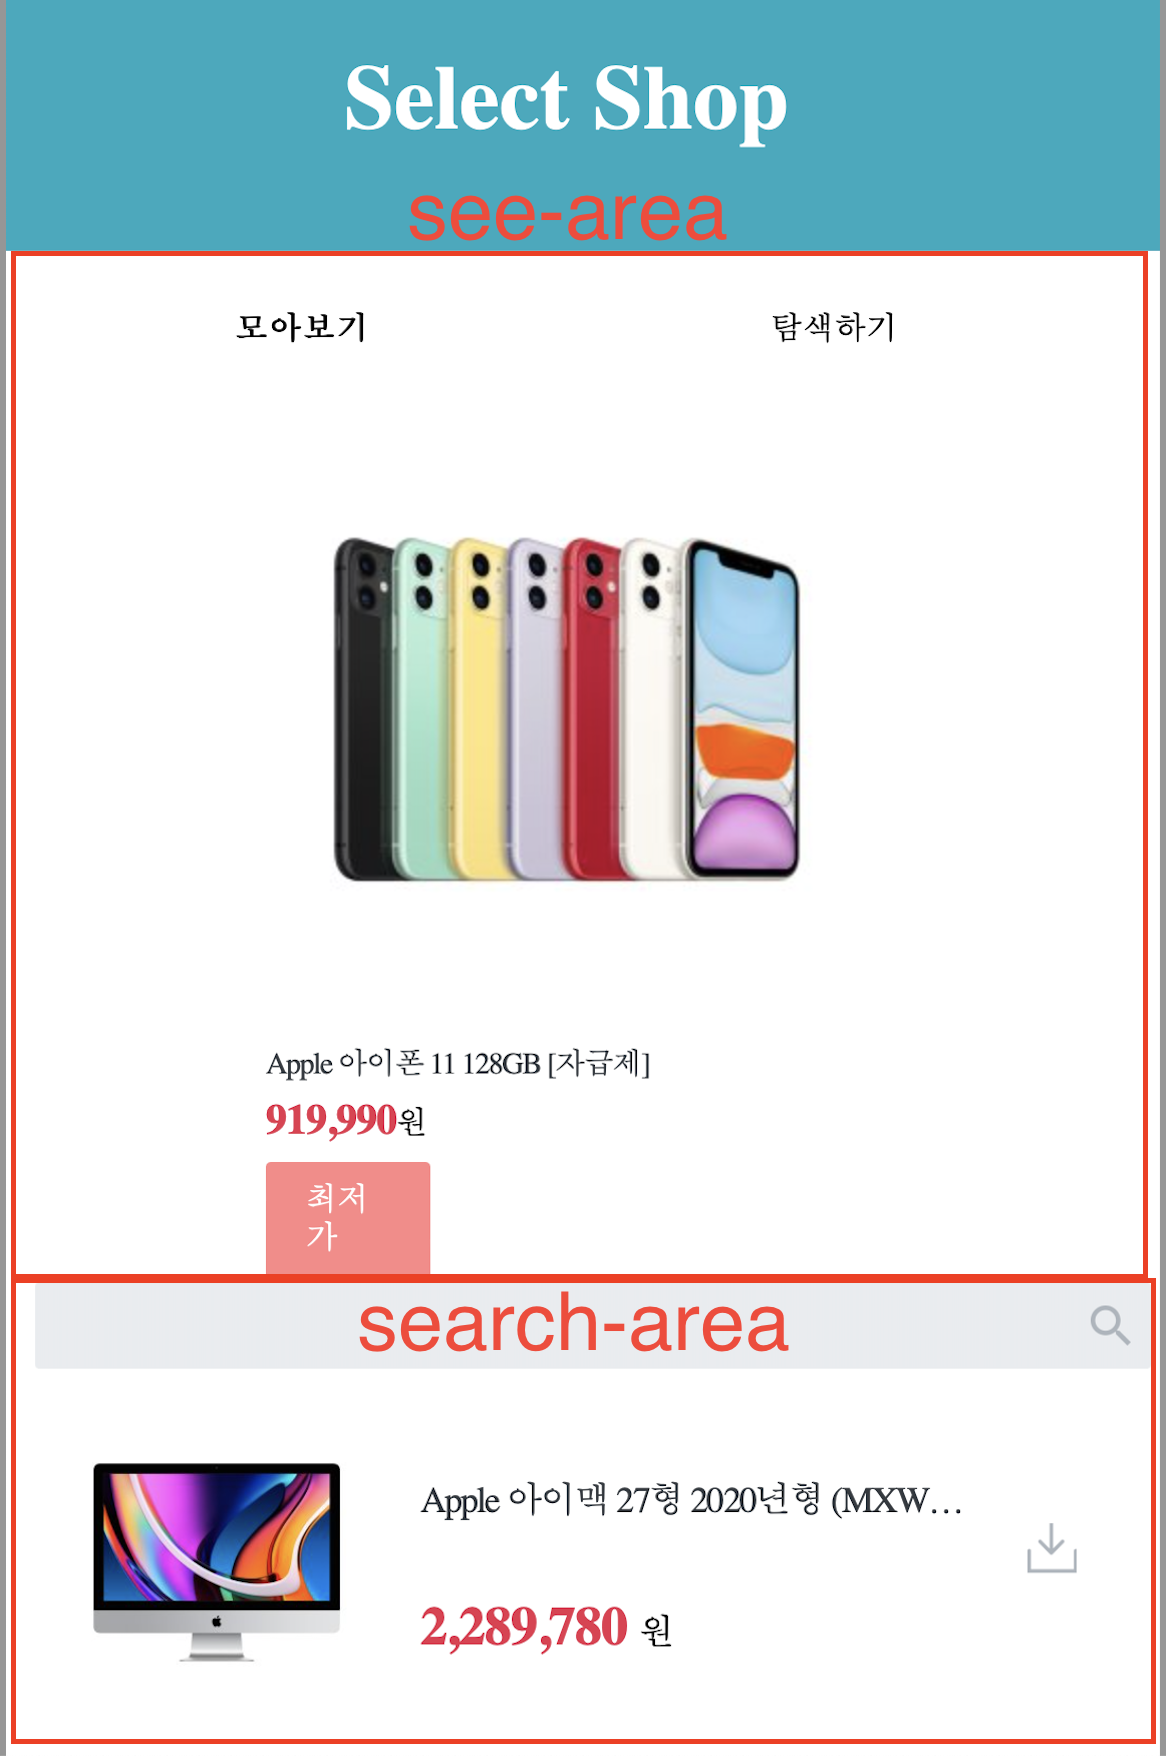
<div id="see-area">
<div id="product-container">
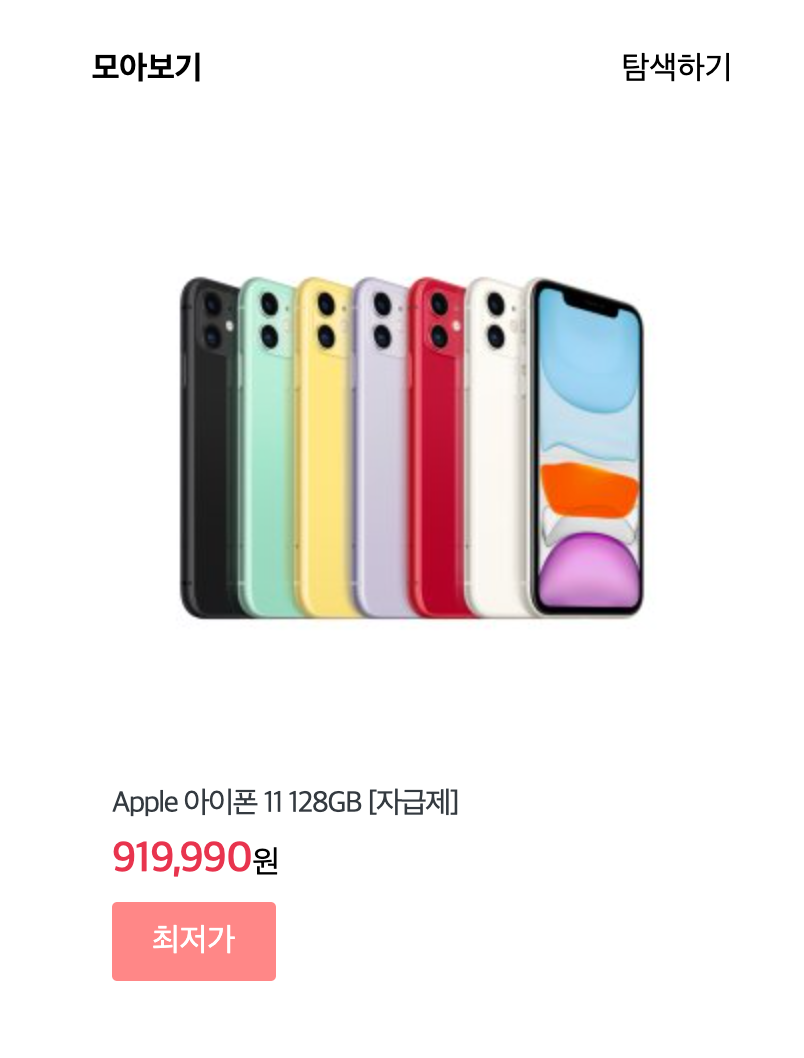
<div class="product-card" onclick="window.location.href='https://spartacodingclub.kr'">
<div class="card-header">
<img src="https://shopping-phinf.pstatic.net/main_2085830/20858302247.20200602150427.jpg?type=f300"
alt="">
</div>
<div class="card-body">
<div class="title">
Apple 아이폰 11 128GB [자급제]
</div>
<div class="lprice">
<span>919,990</span>원
</div>
<div class="isgood">
최저가
</div>
</div>
</div>
</div>
</div>
<div id="search-area">
<div>
<input type="text" id="query">
<!-- <img src="images/icon-search.png" alt="">-->
</div>
<div id="search-result-box">
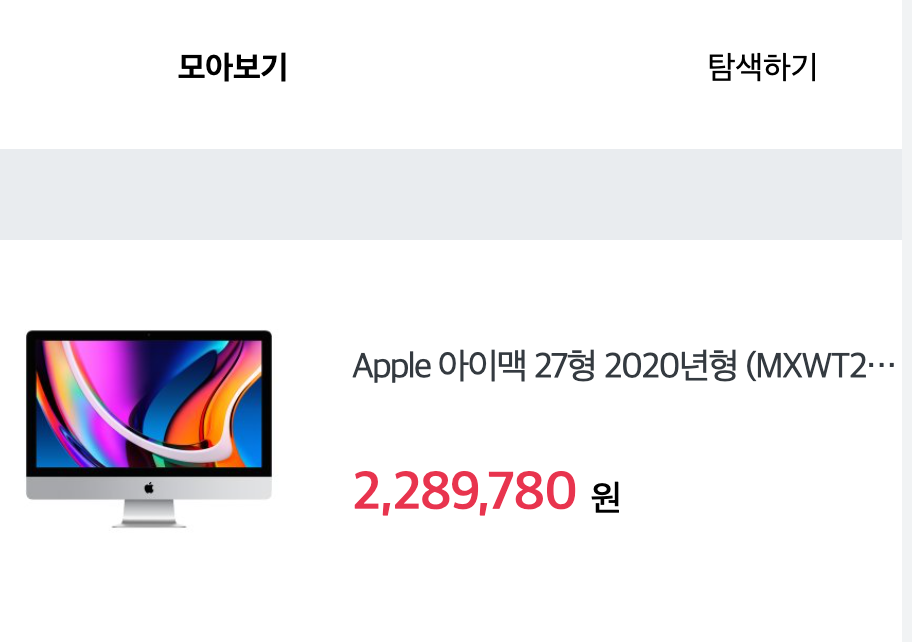
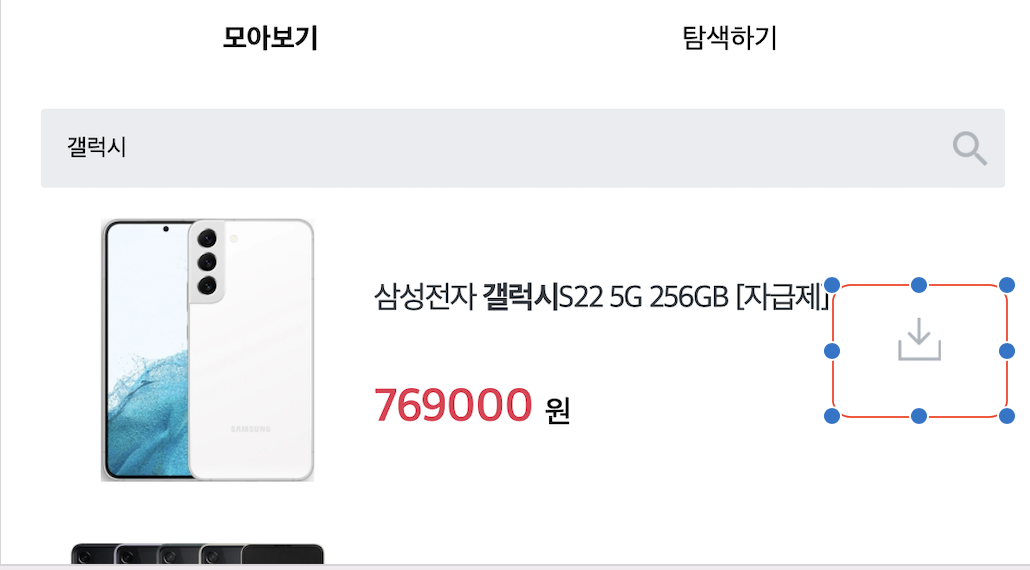
<div class="search-itemDto">
<div class="search-itemDto-left">
<img src="https://shopping-phinf.pstatic.net/main_2399616/23996167522.20200922132620.jpg?type=f300" alt="">
</div>
<div class="search-itemDto-center">
<div>Apple 아이맥 27형 2020년형 (MXWT2KH/A)</div>
<div class="price">
2,289,780
<span class="unit">원</span>
</div>
</div>
<div class="search-itemDto-right">
<img src="images/icon-save.png" alt="" onclick='addProduct()'>
</div>
</div>
</div>
<div id="container" class="popup-container">
<div class="popup">
<button id="close" class="close">
X
</button>
<h1>⏰최저가 설정하기</h1>
<p>최저가를 설정해두면 선택하신 상품의 최저가가 떴을 때<br/> 표시해드려요!</p>
<div>
<input type="text" id="myprice" placeholder="200,000">원
</div>
<button class="cta" onclick="setMyprice()">설정하기</button>
</div>
</div>
</div>
</body>
</html>
이번 프로젝트에서 사용할 style.css 입니다.
body {
    margin: 0px;
}

#search-result-box {
    margin-top: 15px;
}

.search-itemDto {
    width: 530px;
    display: flex;
    flex-direction: row;
    align-content: center;
    justify-content: space-around;
}

.search-itemDto-left img {
    width: 159px;
    height: 159px;
}

.search-itemDto-center {
    display: flex;
    flex-direction: column;
    align-items: center;
    justify-content: space-evenly;
}

.search-itemDto-center div {
    width: 280px;
    height: 23px;
    font-size: 18px;
    font-weight: normal;
    font-stretch: normal;
    font-style: normal;
    line-height: 1.3;
    letter-spacing: -0.9px;
    text-align: left;
    color: #343a40;
    overflow: hidden;
    white-space: nowrap;
    text-overflow: ellipsis;
}

.search-itemDto-center div.price {
    height: 27px;
    font-size: 27px;
    font-weight: 600;
    font-stretch: normal;
    font-style: normal;
    line-height: 1;
    letter-spacing: -0.54px;
    text-align: left;
    color: #E8344E;
}

.search-itemDto-center span.unit {
    width: 17px;
    height: 18px;
    font-size: 18px;
    font-weight: 500;
    font-stretch: normal;
    font-style: normal;
    line-height: 1;
    letter-spacing: -0.9px;
    text-align: center;
    color: #000000;
}

.search-itemDto-right {
    display: inline-block;
    height: 100%;
    vertical-align: middle
}

.search-itemDto-right img {
    height: 25px;
    width: 25px;
    vertical-align: middle;
    margin-top: 60px;
    cursor: pointer;
}

input#query {
    padding: 15px;
    width: 526px;
    border-radius: 2px;
    background-color: #e9ecef;
    border: none;

    background-image: url('images/icon-search.png');
    background-repeat: no-repeat;
    background-position: right 10px center;
    background-size: 20px 20px;
}

input#query::placeholder {
    padding: 15px;
}

button {
    color: white;
    border-radius: 4px;
    border-radius: none;
}

.popup-container {
    display: none;
    position: fixed;
    top: 0;
    left: 0;
    bottom: 0;
    right: 0;
    background-color: rgba(0, 0, 0, 0.5);
    align-items: center;
    justify-content: center;
}

.popup-container.active {
    display: flex;
}

.popup {
    padding: 20px;
    box-shadow: 2px 2px 10px rgba(0, 0, 0, 0.3);
    position: relative;
    width: 370px;
    height: 190px;
    border-radius: 11px;
    background-color: #ffffff;
}

.popup h1 {
    margin: 0px;
    font-size: 22px;
    font-weight: 500;
    font-stretch: normal;
    font-style: normal;
    line-height: 1;
    letter-spacing: -1.1px;
    color: #000000;
}

.popup input {
    width: 330px;
    height: 39px;
    border-radius: 2px;
    border: solid 1.1px #dee2e6;
    margin-right: 9px;
    margin-bottom: 10px;
    padding-left: 10px;
}

.popup button.close {
    position: absolute;
    top: 15px;
    right: 15px;
    color: #adb5bd;
    background-color: #fff;
    font-size: 19px;
    border: none;
}

.popup button.cta {
    width: 369.1px;
    height: 43.9px;
    border-radius: 2px;
    background-color: #15aabf;
    border: none;
}

#search-area, #see-area {
    width: 530px;
    margin: auto;
}

.nav {
    width: 530px;
    margin: 30px auto;
    display: flex;
    align-items: center;
    justify-content: space-around;
}

.nav div {
    cursor: pointer;
}

.nav div.active {
    font-weight: 700;
}

.header {
    background-color: #15aabf;
    color: white;
    text-align: center;
    padding: 50px;
    font-size: 45px;
    font-weight: bold;
}

#product-container {
    grid-template-columns: 100px 50px 100px;
    grid-template-rows: 80px auto 80px;
    column-gap: 10px;
    row-gap: 15px;
}

.product-card {
    width: 300px;
    margin: auto;
    cursor: pointer;
}

.product-card .card-header {
    width: 300px;
}

.product-card .card-header img {
    width: 300px;
}

.product-card .card-body {
    margin-top: 15px;
}

.product-card .card-body .title {
    font-size: 15px;
    font-weight: normal;
    font-stretch: normal;
    font-style: normal;
    line-height: 1;
    letter-spacing: -0.75px;
    text-align: left;
    color: #343a40;
    margin-bottom: 10px;
}

.product-card .card-body .lprice {
    font-size: 15.8px;
    font-weight: normal;
    font-stretch: normal;
    font-style: normal;
    line-height: 1;
    letter-spacing: -0.79px;
    color: #000000;
    margin-bottom: 10px;
}

.product-card .card-body .lprice span {
    font-size: 21.4px;
    font-weight: 600;
    font-stretch: normal;
    font-style: normal;
    line-height: 1;
    letter-spacing: -0.43px;
    text-align: left;
    color: #E8344E;
}

.product-card .card-body .isgood {
    margin-top: 10px;
    padding: 10px 20px;
    color: white;
    border-radius: 2.6px;
    background-color: #ff8787;
    width: 42px;
}

.none {
    display: none;
}
탐색하기 기능 구현
$(document).ready(function () {
  $('#see-area').show();
  $('#search-area').hide();
})
$(document).ready(function () {

  $('#see-area').show();
  $('#search-area').hide();

  $('.nav div.nav-see').on('click', function () {
      $('#see-area').show();
      $('#search-area').hide();
  })
  $('.nav div.nav-search').on('click', function () {
      $('#see-area').hide();
      $('#search-area').show();
  })
})
// 검색 요청을 했을 경우
$('#query').on('keypress', function (e) {
    if (e.key == 'Enter') {
        execSearch();
    }
});
검색 요청을 했을 경우 실행
검색어가 빈 문자열인지 확인 (유효성 검사)
검색한 내용이 무엇인지 확인하고, 백엔드에 검색어를 넘긴다.
네이버 api 검색 결과를 반환 받고
반환 받은 내용을 토대로 뷰를 작성한다.
function execSearch() {
  // 검색한 내용이 무엇인지 확인
  let query = $('#query').val();

  // 빈 문자열인지 확인
  if (query == '') {
    alert("검색어를 입력하세요")
    $('#query').focus();
    return;
  }
  // 백엔드에 검색어를 넘긴다.
  $.ajax({
      type: 'GET',
      url: `/api/search?query=${query}`,
      success: function (response) {
      }
  })
}
자 이제 domain을 생성할 차례
@Getter
@MappedSuperclass
@EntityListeners(AuditingEntityListener.class)
public abstract class TimeStamped {
    @CreatedDate
    private LocalDateTime createdAt;
    @LastModifiedDate
    private LocalDateTime modifiedAt;
}
@EnableJpaAuditing
@SpringBootApplication
public class TimelineApplication {

   public static void main(String[] args) {
      SpringApplication.run(TimelineApplication.class, args);
   }

}
@Getter
public class ProductDto {
    private String title;

    private String image;

    private int lprice;

    private String link;
}
@Entity
public class Product extends TimeStamped {

    @Id
    @GeneratedValue(strategy = GenerationType.AUTO)
    private Long id;

    @Column(nullable = false)
    private String title;

    @Column(nullable = false)
    private String image;

    @Column(nullable = false)
    private int lprice;

    @Column(nullable = false)
    private String link;

    public Product(ProductDto productDto) {
        this.title = productDto.getTitle();
        this.image = productDto.getImage();
        this.lprice = productDto.getLprice();
        this.link = productDto.getLink();
    }
}
@RestController
public class ProductController {

    @GetMapping("/api/search")
    public void search(@RequestParam String query) {

    }
}
흠 main으로 만들어놨네?
사용하기 편하도록 변경해볼까?
public class NaverShopSearch {

    public static void main(String[] args) {
        RestTemplate rest = new RestTemplate();
        HttpHeaders headers = new HttpHeaders();
        headers.add("X-Naver-Client-Id", "id 입력하세요");
        headers.add("X-Naver-Client-Secret", "password 입력하세요");
        String body = "";

        HttpEntity<String> requestEntity = new HttpEntity<String>(body, headers);
        ResponseEntity<String> responseEntity = rest.exchange("https://openapi.naver.com/v1/search/shop.json?query=nike", HttpMethod.GET, requestEntity, String.class);
        HttpStatus httpStatus = responseEntity.getStatusCode();
        int status = httpStatus.value();
        String response = responseEntity.getBody();

        JSONObject jsonObject = new JSONObject(response);
        JSONArray items = jsonObject.getJSONArray("items");

        for (int i = 0; i < items.length(); i++) {
            JSONObject item = items.getJSONObject(i);
            int lprice = item.getInt("lprice");
            String link = item.getString("link");
            String title = item.getString("title");
            String image = item.getString("image");
            System.out.printf("%s\n%s\n%s\n%s",title, lprice, link, image);
            break;
        }

    }
}
@Component
public class NaverShopSearch {

    public JSONObject search(String query) {
        RestTemplate rest = new RestTemplate();
        HttpHeaders headers = new HttpHeaders();
        headers.add("X-Naver-Client-Id", "id를 입력하세요");
        headers.add("X-Naver-Client-Secret", "비밀번호를 입력하세요");
        String body = "";

        HttpEntity<String> requestEntity = new HttpEntity<String>(body, headers);
        ResponseEntity<String> responseEntity = rest.exchange("https://openapi.naver.com/v1/search/shop.json?query=" + query, HttpMethod.GET, requestEntity, String.class);
        HttpStatus httpStatus = responseEntity.getStatusCode();
        int status = httpStatus.value();
        String response = responseEntity.getBody();

        JSONObject jsonObject = new JSONObject(response);
        return jsonObject;
    }

    public List<ProductDto> JsonObjectToProductDtoList(JSONObject jsonObject) {
        JSONArray items = jsonObject.getJSONArray("items");

        List<ProductDto> productDtoList = new ArrayList<>();
        for (int i = 0; i < items.length(); i++) {
            JSONObject item = items.getJSONObject(i);
            ProductDto productDto = new ProductDto(item);
            productDtoList.add(productDto);
        }
        return productDtoList;
    }
}
@RestController
@RequiredArgsConstructor
public class ProductController {

    private final NaverShopSearch naverShopSearch;

    @GetMapping("/api/search")
    public List<ProductDto> search(@RequestParam String query) {
        JSONObject jsonObject = naverShopSearch.search(query);
        List<ProductDto> productDtoList = naverShopSearch.JsonObjectToProductDtoList(jsonObject);
        return productDtoList;
    }
}
function execSearch() {
  // 검색한 내용이 무엇인지 확인
  let query = $('#query').val();

  // 빈 문자열인지 확인
  if (query == '') {
    alert("검색어를 입력하세요")
    $('#query').focus();
    return;
  }
  // 백엔드에 검색어를 넘긴다.

  $.ajax({
      type: 'GET',
      url: `/api/search?query=${query}`,
      success: function (response) {
        // 검색되어 있던 기록 없애고
        $('#search-result-box').empty();
        for (let i = 0; i < response.length; i++) {
          // 새로운 검색 결과 카드를 하나씩 생성
          let tempHtml = makeSearchHtml(response[i]);
          $('#search-result-box').append(tempHtml);
        }
      }
  })
}

function makeSearchHtml(itemDto) {
  return `<div class="search-itemDto">
     <div class="search-itemDto-left">
       <img src="${itemDto.image}" alt="">
     </div>
     <div class="search-itemDto-center">
       <div>${itemDto.title}</div>
       <div class="price">
         ${itemDto.lprice}
         <span class="unit">원</span>
       </div>
     </div>
     <div class="search-itemDto-right">
       <img src="images/icon-save.png" alt="" onclick='addProduct(${JSON.stringify(itemDto)})'>
     </div>
  </div>`
}
검색 기능을 구현 완료하였습니다.
관심 상품 등록 & 조회
빨간색 칸을 누르면 모아보기 칸으로 이동해야겠네요
<div class="search-itemDto-right">
  <img src="images/icon-save.png" alt="" onclick='addProduct()'>
</div>
itemDto를 백엔드로 넘긴다.
백엔드에서는 itemDto 정보를 db에 저장한다.
function addProduct(itemDto) {
//    console.log(itemDto);
//    console.log(JSON.stringify(itemDto))
    $.ajax({
        type: "POST",
        url: '/api/products',
        contentType: "application/json",
        data: JSON.stringify(itemDto),
        success: function (response) {

        }
    })
}
h2 database
spring.h2.console.enabled=true
spring.datasource.url=jdbc:h2:mem:testdb

spring.jpa.show-sql=true
@Getter
public class ProductMypriceRequestDto {
    private int myprice;
}
@RestController
@RequiredArgsConstructor
public class ProductController {
private final NaverShopSearch naverShopSearch;
private final ProductRepository productRepository;
@GetMapping("/api/search")
public List<ProductDto> search(@RequestParam String query) {
JSONObject jsonObject = naverShopSearch.search(query);
List<ProductDto> productDtoList = naverShopSearch.JsonObjectToProductDtoList(jsonObject);
return productDtoList;
}
@PostMapping("/api/products")
public ProductDto save(@RequestBody ProductDto productDto) {
Product product = new Product(productDto);
productRepository.save(product);
return productDto;
}
}noargsconstructor 추가
requestbody를 사용하려면 기본 생성자와 getter가 필요하다
@NoArgsConstructor
@Getter
public class ProductDto {
    private String title;

    private String image;

    private int lprice;

    private String link;

    public ProductDto(JSONObject item) {
        this.lprice = item.getInt("lprice");
        this.link = item.getString("link");
        this.title = item.getString("title");
        this.image = item.getString("image");
    }
}
$.ajax({
    type: "POST",
    url: '/api/products',
    contentType: "application/json",
    data: JSON.stringify(itemDto),
    success: function (response) {
        // 2. 응답 함수에서 modal을 뜨게 하고, targetId 를 reponse.id 로 설정 (숙제로 myprice 설정하기 위함)
        $('#container').addClass('active');
        targetId = response.id;
    }
})
modal
<div id="container" class="popup-container">
  <div class="popup">
    <button id="close" class="close">
      X
    </button>
    <h1>⏰최저가 설정하기</h1>
    <p>최저가를 설정해두면 선택하신 상품의 최저가가 떴을 때<br/> 표시해드려요!</p>
    <div>
      <input type="text" id="myprice" placeholder="200,000">원
    </div>
    <button class="cta" onclick="setMyprice()">설정하기</button>
  </div>
</div>
function setMyprice() {
    /**
     * 숙제! myprice 값 설정하기.
     * 1. id가 myprice 인 input 태그에서 값을 가져온다.
     * 2. 만약 값을 입력하지 않았으면 alert를 띄우고 중단한다.
     * 3. PUT /api/product/${targetId} 에 data를 전달한다.
     *    주의) contentType: "application/json",
     *         data: JSON.stringify({myprice: myprice}),
     *         빠뜨리지 말 것!
     * 4. 모달을 종료한다. $('#container').removeClass('active');
     * 5, 성공적으로 등록되었음을 알리는 alert를 띄운다.
     * 6. 창을 새로고침한다. window.location.reload();
     */
    // 1. id가 myprice 인 input 태그에서 값을 가져온다.
    let myprice = $('#myprice').val();
    // 2. 만약 값을 입력하지 않았으면 alert를 띄우고 중단한다.
    if (myprice == '') {
        alert('올바른 가격을 입력해주세요');
        return;
    }
    // 3. PUT /api/product/${targetId} 에 data를 전달한다.
    $.ajax({
        type: "PUT",
        url: `/api/products/${targetId}`,
        contentType: "application/json",
        data: JSON.stringify({myprice: myprice}),
        success: function (response) {
            // 4. 모달을 종료한다. $('#container').removeClass('active');
            $('#container').removeClass('active');
            // 5. 성공적으로 등록되었음을 알리는 alert를 띄운다.
            alert('성공적으로 등록되었습니다.');
            // 6. 창을 새로고침한다. window.location.reload();
            window.location.reload();
        }
    })
}
getter 를 달았다.
@Entity
@Getter
public class Product extends TimeStamped {

    @Id
    @GeneratedValue(strategy = GenerationType.AUTO)
    private Long id;

    @Column(nullable = false)
    private String title;

    @Column(nullable = false)
    private String image;

    @Column(nullable = false)
    private int lprice;

    @Column(nullable = false)
    private String link;

    private int myPrice;

    public Product(ProductDto productDto) {
        this.title = productDto.getTitle();
        this.image = productDto.getImage();
        this.lprice = productDto.getLprice();
        this.link = productDto.getLink();
        this.myPrice = 0;
    }

    public void updatePrice(int myPrice) {
        this.myPrice = myPrice;
    }
}
@RestController
@RequiredArgsConstructor
public class ProductController {

    private final NaverShopSearch naverShopSearch;
    private final ProductRepository productRepository;
    private final ProductService productService;

    @PutMapping("/api/products/{targetId}")
    public void update(@RequestBody ProductMypriceRequestDto requestDto, @PathVariable Long targetId) {
        productService.updatePrice(targetId, requestDto);

    }
}
@Service
@RequiredArgsConstructor
public class ProductService {

    private final ProductRepository productRepository;

    public void updatePrice(Long targetId, ProductMypriceRequestDto requestDto) {
        Product product = productRepository.findById(targetId).orElseThrow(
            () -> new IllegalArgumentException("상품이 존재하지 않습니다.")
        );

        product.updatePrice(requestDto.getMyprice());
    }
}
모달 끄기
$('#close').on('click', function () {
    $('#container').removeClass('active');
})
$(document).ready(function () {

  $('#see-area').show();
  $('#search-area').hide();

  // 모아보기 눌렀을 경우
  $('.nav div.nav-see').on('click', function () {
      $('#see-area').show();
      $('#search-area').hide();
  })

  // 탐색하기 눌렀을 경우
  $('.nav div.nav-search').on('click', function () {
      $('#see-area').hide();
      $('#search-area').show();
  })

  // 검색 요청을 했을 경우
  $('#query').on('keypress', function (e) {
      if (e.key == 'Enter') {
          execSearch();
      }
  });

  // 모달 x 버튼 클릭했을 때
  $('#close').on('click', function () {
      $('#container').removeClass('active');
  })

  showProduct();
})
function showProduct() {
/**
     * 관심상품 목록: #product-container
     * 검색결과 목록: #search-result-box
     * 관심상품 HTML 만드는 함수: addProductItem
     */

    // 1. GET /api/products 요청
    $.ajax({
      type: 'GET',
      url: '/api/products',
      success: function (response) {
          // 2. 관심상품 목록, 검색결과 목록 비우기
          $('#product-container').empty();
          $('#search-result-box').empty();
          // 3. for 문마다 관심 상품 HTML 만들어서 관심상품 목록에 붙이기!
          for (let i = 0; i < response.length; i++) {
              let product = response[i];
              let tempHtml = addProductItem(product);
              $('#product-container').append(tempHtml);
          }
      }
  })
}
@RestController
@RequiredArgsConstructor
public class ProductController {
private final NaverShopSearch naverShopSearch;
private final ProductRepository productRepository;
private final ProductService productService;
@GetMapping("/api/products")
public List<Product> show() {
return productRepository.findAll();
}
}function showProduct() {
/**
* 관심상품 목록: #product-container
* 검색결과 목록: #search-result-box
* 관심상품 HTML 만드는 함수: addProductItem
*/
// 1. GET /api/products 요청
$.ajax({
type: 'GET',
url: '/api/products',
success: function (response) {
// 2. 관심상품 목록, 검색결과 목록 비우기
$('#product-container').empty();
$('#search-result-box').empty();
// 3. for 문마다 관심 상품 HTML 만들어서 관심상품 목록에 붙이기!
for (let i = 0; i < response.length; i++) {
let product = response[i];
let tempHtml = addProductItem(product);
$('#product-container').append(tempHtml);
}
}
})
}
function addProductItem(product) {
    // link, image, title, lprice, myprice 변수 활용하기
    return `<div class="product-card" onclick="window.location.href='${product.link}'">
                <div class="card-header">
                    <img src="${product.image}"
                         alt="">
                </div>
                <div class="card-body">
                    <div class="title">
                        ${product.title}
                    </div>
                    <div class="lprice">
                        <span>${numberWithCommas(product.lprice)}</span>원
                    </div>
                    <div class="isgood ${product.lprice > product.myprice ? 'none' : ''}">
                        최저가
                    </div>
                </div>
            </div>`;
}